
Why Short Film Edits Break Down After the First Cut
A short film feels manageable right up until it doesn't. The editor has a watchable cut, the scenes play, the performances land. Then reality arrives: the media is split across camera tapes, render files, title projects, audio exports, and disc assets, and none of them agree on where they live.
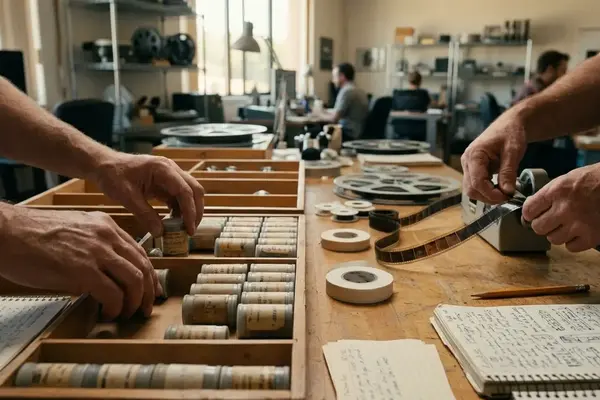
That collision point is where most short-film workflows quietly fail. A 12-minute piece can spawn dozens of separate assets once you add dialogue exports, music stems, title renders, chapter markers, MPEG-2 files, and web encodes. The cut was never the hard part. The path from a finished timeline to a set of reliable deliverables is.
This article builds that path around a bounded historical model: the Video Symphony DV Workshop, a period training program built on Final Cut Pro, Apple workstations, disc authoring, and compression. The goal is not nostalgia. It is to show how a structured sequence — DV capture, nonlinear editing, audio finishing, title creation, render management, disc authoring, web compression, protects a project from falling apart after the first cut.
Capture discipline carries more weight than it seems. Tape timecode, scratch disk location, and reel naming decide whether you can recapture, export an EDL, or recover an archive later. Get those wrong and the timeline still plays today while failing silently the moment someone tries to conform it.
The Workshop Context: DV Training Before the All-in-One App Era
The historical anchor is a May 2001 training announcement describing DV post-production instruction built around a primary nonlinear editor running on G4-class workstations. Final Cut Pro sat at the center; Apple hardware supplied the room.
Barry Braverman developed and taught the DV Workshop. His relevance here is narrow and specific: a period instructor for nonlinear editing and disc authoring in this training setting. Nothing about that role should be stretched into broader claims.
Mike Flanagan, President of Video Symphony, appears in connection with that archived announcement and nothing more. The point is the curriculum logic, not an institutional pitch.
What makes the workshop useful as an organizing frame is its shape. The program ran across a Day 1 through Day 4 structure, and that sequence maps cleanly onto how a careful assistant editor would build any project:
- Day 1 — capture and setup
- Day 2, editing
- Day 3, finishing
- Day 4, authoring and compression
Follow that order and the software features fall into place on their own. Reverse it, and you spend Day 4 fixing problems you created on Day 1.
The Complete Workflow Map: Capture, Cut, Finish, Author, Compress
Build the map in the same order an editor protects a project: assign reel names before capture, create bins before cutting, lock storage paths before rendering, then decide which deliverables you actually owe before any final export.
A workable folder spine looks like this:
- 01_Project
- 02_Capture_Scratch
- 03_Audio
- 04_Graphics_Titles
- 05_Renders
- 06_Exports
- 07_Disc_Authoring
- 08_Web_Encodes
- 09_Documents
DV NTSC material in this era commonly used 720 x 480 raster dimensions, 29.97 fps timing, and 48 kHz audio. Those numbers are not trivia. They dictate how your titles render, how your audio resamples, and how your disc encode behaves later.
Reel naming deserves real attention. Labels like TAPE_001 or SC01_TK01 survive recapture; camera-card-style names that never existed in a DV tape workflow do not. A project with broken reel naming can look perfectly healthy during editing and then fail during recapture or conform, because the timeline points at timecode with no reliable source-tape identity behind it.
The tools occupy fixed positions in this map: Final Cut Pro for nonlinear editing, Soundtrack for audio, LiveType for titles, DVD Studio Pro for authoring, and Cleaner 5 with QuickTime for compression and streaming. Compression planning belongs early, not at the end — a web encode, a disc encode, and an archival master may each need their own file rather than one universal output.
Hardware and Media Setup: From Apple G4 Rooms to G5 Updates
Start with the weakest link, not the most impressive component. The workstation matters, but the workflow fails faster when capture scratch sits on the wrong disk or a backup route was never planned. Storage path, capture device, and backup come first.

The hardware window is bounded. The original training environment leaned on G4-class workstations. A December 2003 update referenced G5-class systems, FireWire 800, Panther-era operating system software, an updated Final Cut Pro, and an updated DVD Studio Pro. That step up meant faster transfer, more responsive cutting, and better behavior when several finishing applications were open at once.
DV runs at roughly 25 Mb/s before file-system and audio overhead. Modest by later standards, but it still punishes fragmented or nearly full drives during capture. Treat FireWire 800 as a path-planning problem: one route for the deck or camera, another for external storage where possible, and a separate backup copy before any major finishing export.
Media Organization Depth
Once the rough cut begins, lock camera originals and captured media to read-only. Edits, renders, and exports should land in working folders instead. Keep five things from ever sharing one flat directory: camera originals, captured working media, render files, disc assets, and web compression outputs. That separation is what lets you redo a single stage without endangering the rest.
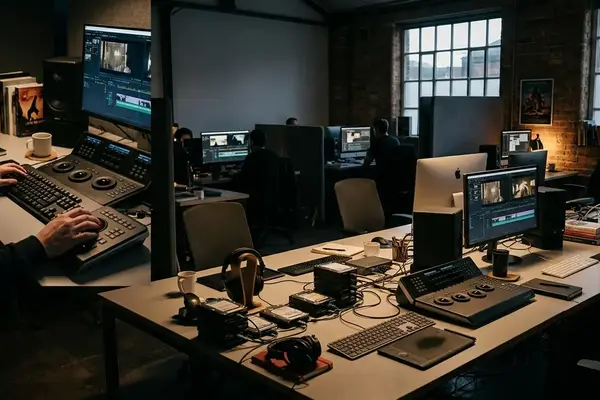
The Editing Core: Building the Film Inside Final Cut Pro 4
This is the instructional center of the workflow, so it gets the most room. The discipline here is simple to state and hard to hold: move from rough assembly to controlled trimming before any heavy finish work. Polishing title cards and speed effects during the first assembly is a trap — that effort gets discarded the moment the scene order changes.
Rough Cut to Fine Cut
In the rough pass, assemble scenes in script order, keep alternate takes in labeled bins, and resist deleting usable production audio until the fine cut is approved. The aim is structure, not finesse. Lock the shape before you sweat the frames.
The fine cut is where four trim tools earn their place, each solving a distinct editorial problem rather than performing a definition:
- Ripple — closes or opens a timing gap by shifting everything downstream.
- Roll, moves the cut point between two adjacent shots without changing the scene's total duration.
- Slip, keeps a shot's length but changes the internal action you see, when the duration is right and the moment is wrong.
- Slide, keeps a shot intact but repositions it between its neighbors.
Time remap waits. If you judge a speed effect before the scene rhythm is stable, you are evaluating the effect instead of the performance timing underneath it. Compositing, keyframing, bundled filter packages, and scripting-based effects all belong in the finishing layer, screen inserts, opacity changes, stylized transitions, and small fixes included.
EDL export enters as a handoff and archive concept. It earns its keep when another finishing room, a conform process, or a preservation workflow needs a simplified edit decision record. You can find the trim behaviors documented in the Apple Final Cut Pro User Guide, though the editorial logic above predates any single version.
Field Note:
Tried building polished speed effects during the first assembly on a short, then dropped them entirely when the scene order shifted. The lesson stuck: structure first, finish second.
Finishing Passes: Audio, Titles, Effects, and Picture Discipline
Finishing is a verification pass, not a decoration pass. It protects clarity, continuity, and whether a first-time viewer actually follows the film. Work the timeline in layers: dialogue intelligibility first, then room tone and effects continuity, then music.
Audio in Soundtrack
Before any export or mix review, separate production dialogue, room tone, music, and effects into distinct track groups. Hold 48 kHz throughout the video workflow to avoid resampling problems in DV and disc-oriented delivery. A dialogue-heavy classroom short demands stricter audio organization and room-tone handling; a music-driven montage shifts attention toward compression artifacts, motion cadence, and title readability instead.
Titles in LiveType
Title checks are concrete. Confirm title-safe positioning, adequate contrast against moving backgrounds, a consistent type style, and enough screen duration for a first-time viewer to read without pausing. Review titles on an interlaced display or a period-equivalent monitor when you can, because thin horizontal strokes and small type shimmer under DV-era viewing conditions.
Effects that generate new render files go in last. Add them only after picture structure is stable, since a late scene change can invalidate title renders, audio timing, disc chapter points, and compressed outputs all at once.
Delivery Planning: DVD Studio Pro, Cleaner 5, and QuickTime
Delivery splits into two separate export decisions: one master suitable for disc encoding, one file prepared for web compression. Confusing the two is how short films end up with a beautiful timeline and a broken disc.
Disc Authoring
Make the authoring decisions before final export. Chapter markers, menu background stills or loops, button names, first-play behavior, and audio format all shape asset preparation. DVD-Video in the NTSC DV context commonly used 720 x 480 MPEG-2, so titles and graphics need a readability check after encoding, not just on the editing timeline. Name disc assets by function — MENU_MAIN_BG, FILM_MPEG2, TRAILER_MPEG2, AUDIO_MAIN, rather than by export date.
Web Compression
Cleaner 5 and QuickTime handle the web path. Plan frame size, codec choice, target data rate, keyframe interval strategy, audio bitrate, and the expected playback environment. Keep at least three export categories alive: edit master, disc encode source, and web encode source. Never overwrite the edit master to make a compressed version.
Important:
A common failure case: a late title correction after the disc menu is already built. Now you re-export the film, re-encode the disc asset, relink the authoring project, and retest chapter navigation. Lock picture before authoring and that whole loop disappears.
Scope and Limitations: How to Use This Archive-Based Workflow Today

Separate the historical evidence from the modern recommendation. This workflow is informed by May 2001 training material and a December 2003 hardware and software update. Nothing here implies current Apple product support, current institutional offerings, present-day enrollment, certification, or live hardware labs.
The tools are dated. The logic is not. The same sequence still helps a student understand why media management, trim discipline, audio organization, title safety, and delivery planning belong inside a single workflow rather than scattered across afterthoughts.
Reporting confirms the curriculum's shape; the workflow value follows from that structure, not from any claim about today's products. One honest qualifier for this particular subject: DV tape timecode and reel identity behave differently from file-based media, so a learner adapting this model to modern cameras should rethink the capture and naming stages first, even while keeping the finishing and delivery logic intact.
Bottom Line:
Treat the Video Symphony DV Workshop as a teaching model for structured post-production, not a purchasing or support guide. Build the path from capture to delivery in order, protect your masters, and the short film survives every change you throw at it.


Your Thoughts
No comments.
Share Your Opinion